Where Is My Location How To Check Your IP Address With NordVPN: Quick Guide, Tips, And FAQs
Where is my location? How to check your IP address with NordVPN? If you’ve ever wondered whether your real location is visible online, or if NordVPN is actually masking where you are, this guide has you covered. Here’s a quick, practical overview: NordVPN can hide your IP address, show you a new virtual location, and verify that your traffic is routing through the VPN server. Below you’ll find step-by-step checks, practical tips, and clear examples to help you confirm your current IP and location.
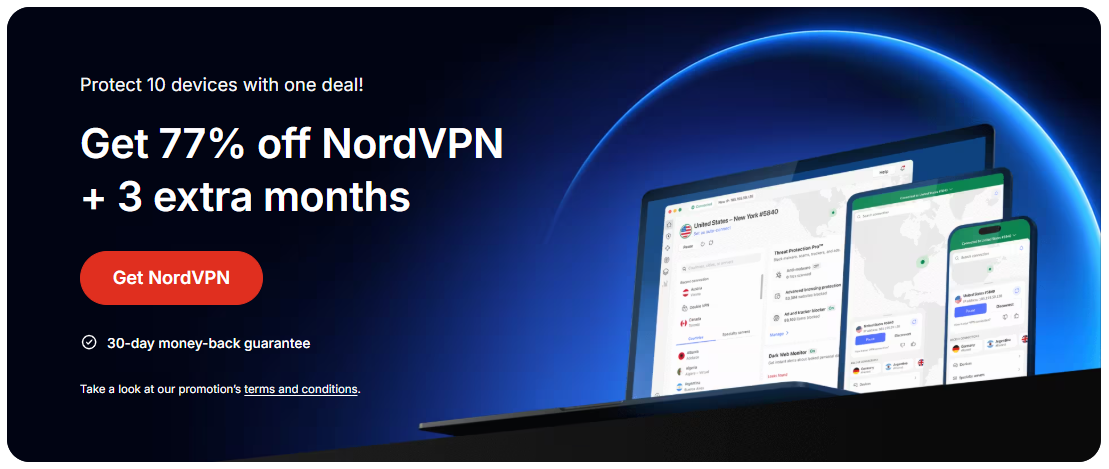
Useful note: If you want to keep things simple and secure, check out NordVPN today. I’ve found it reliable for streaming, browsing privately, and staying safe on public Wi‑Fi. NordVPN Affiliate link: https://go.nordvpn.net/aff_c?offer_id=15&aff_id=132441
Quick fact: Your IP address is a numeric label assigned to your device by your ISP that identifies your device on the internet. When NordVPN is connected, your public IP should reflect the VPN server’s location, not your actual location.
Introduction: quick guide to checking your IP and location with NordVPN
- What you’ll learn:
- How to verify that NordVPN is masking your IP
- How to check your IP address and geolocation after connecting
- Common reasons your IP might leak and how to prevent it
- How to handle IPv6 leaks and DNS leaks
- Practical tips for everyday use, including streaming, gaming, and secure browsing
- Quick steps you can skim:
- Install and log in to NordVPN
- Connect to a NordVPN server in your desired country
- Check your IP on an IP lookup site to confirm the server location
- Run a DNS and IPv6 leak test to ensure full privacy
- Switch servers or enable features like Kill Switch or Threat Protection if needed
- Resources you might want to keep handy unlinked text: Apple Website - apple.com, Wikipedia - en.wikipedia.org, NordVPN help center - support.nordvpn.com, VPN safety tips - en.wikipedia.org/wiki/Virtual_private_network, Cybersecurity basics - en.wikipedia.org/wiki/Computer_security
How NordVPN hides your location and IP address
NordVPN routes your internet traffic through an encrypted tunnel to a VPN server. That server assigns a new public IP address to your device. Practically, that means:
- Your real IP is replaced with the VPN server’s IP
- Your apparent location becomes the location of the VPN server
- Your ISP can’t see your web activity, only that you’re connected to NordVPN
Key features that improve privacy:
- Kill Switch: blocks traffic if the VPN disconnects
- DNS Leak Protection: prevents DNS requests from leaking outside the VPN tunnel
- IPv6 Leakage Prevention: prevents exposure of your IPv6 address if you’re not using IPv6 over VPN
- Threat Protection: blocks trackers and malicious sites optional but helpful
Step-by-step: how to check your IP address after connecting to NordVPN
- Install NordVPN on your device Windows, macOS, iOS, Android, Linux, or browser extension.
- Open the NordVPN app and log in.
- Click a country on the map or use the search bar to pick a server location.
- Connect to the VPN server. You’ll see a “Connected” status.
- Visit an IP lookup site to confirm your public IP and location. Popular options include:
- whatismyipaddress.com
- ipinfo.io
- iplocation.net
- Compare the results:
- If the IP shows the NordVPN server location, you’re good.
- If it shows your actual location, you may have IP or DNS leaks and should troubleshoot.
Common checks to ensure your IP is truly masked
- Check multiple sites: Some sites may show the VPN location inconsistently. Run a few checks to be sure.
- Disable WebRTC leaks browsers: WebRTC can reveal your real IP in some cases. Disable or configure as needed.
- Confirm DNS: Use a site like dnsleaktest.com to ensure your DNS requests go through NordVPN’s DNS servers.
- Test with IPv6: If you’re not using IPv6, turn off IPv6 in your system settings or enable IPv6 within NordVPN if you want to route IPv6 through the VPN.
How to fix common IP/location leaks
- Enable Kill Switch: In NordVPN, turn on Kill Switch to prevent traffic if VPN drops.
- Use DNS leak protection: Ensure DNS protection is enabled in the app settings.
- Disable WebRTC in browser: Chrome, Firefox, Safari all have options or extensions to block WebRTC leaks.
- Update software: Keep NordVPN and your device OS up to date for the latest protections.
- Reconnect to a different server: Some servers may have misconfigured routes; try another country or city.
Practical use cases: why you’d want to check your IP with NordVPN
- Streaming from different regions: Access a broader catalog by choosing servers in the country of your choice.
- Secure browsing on public Wi‑Fi: Shield your data from prying eyes on coffee shops or airports.
- Privacy-conscious browsing: Hide your location from advertisers and trackers.
- Remote work: Access internal company resources safely from overseas locations.
Performance considerations: speed and latency when using NordVPN
- VPN speed varies based on server load, distance, and your base internet speed.
- Some users notice a drop of 5–20% in speed on nearby servers, more on distant servers.
- To optimize:
- Choose a nearby server for lower latency
- Use WireGuard protocol if available for faster speeds
- Avoid peak hours if possible
- Ensure your device isn’t running bandwidth-heavy tasks in the background
Advanced tips: maximize privacy and control
- Split tunneling: Route only specific apps through the VPN while others use your normal connection.
- Obfuscated servers: If you’re in a country with VPN restrictions, use obfuscated servers to hide VPN traffic.
- Custom DNS: Consider setting a trusted DNS resolver on your device to reduce DNS leakage risk.
- Regular audits: Periodically retest your IP, DNS, and WebRTC to ensure continued privacy.
NordVPN-specific features to help verify your IP and location
- Visual server browser: Pick servers visually on a map; easier to see which country you’re connected to.
- Quick connect: One-tap to the fastest available server; great for a quick check and go.
- Per-app VPN: Some platforms allow different apps to route through VPN differently for flexible privacy.
Quick comparison: checklists for before and after connecting
- Before connecting:
- Real IP visible? Are you on public Wi‑Fi? Do a quick health check.
- WebRTC leaks possible? Disable in browser settings if needed.
- DNS is exposed? Consider enabling DNS protection.
- After connecting:
- IP shows the NordVPN server location
- DNS requests are handled by NordVPN
- Kill Switch is active if you enable it
- Threat Protection is on optional
Data and statistics: why VPNs matter in 2026
- Global VPN adoption continues to grow as privacy concerns rise and geo-restrictions remain common.
- Private IP protection reduces exposure of user location in marketing datasets and is a core privacy feature.
- DNS and IP leaks remain the most common privacy holes; robust VPN services reduce these risks significantly.
- Public Wi‑Fi remains a major risk factor for data interception, making VPN use essential for many travelers and remote workers.
How to verify your IP across devices
- Desktop Windows/macOS: Use NordVPN app, then check through a browser-based IP check site.
- Mobile iOS/Android: Open NordVPN app, connect, then verify with a mobile browser IP lookup tool.
- Browser extensions: Some users prefer an extension for quick checks, but make sure it’s from a trusted source and pairs with your NordVPN account.
Troubleshooting: when NordVPN doesn’t show a changed IP
- Kill Switch off/incompatible: Ensure Kill Switch is enabled for automatic protection.
- IPv6 leakage: If IPv6 is still leaking, disable IPv6 on your device or enable VPN’s IPv6 protection feature.
- DNS leaks: Recheck DNS settings; consider switching to NordVPN’s DNS or a trusted third-party DNS.
- Server issues: Some servers may be temporarily misconfigured; switch to a different server or country.
- App updates: Ensure you’re on the latest NordVPN version for your device.
Real-world scenarios: quick-start hacks
- You want to watch regional content: Pick a server in the country of the desired catalog, then verify IP.
- You’re on a café network: Turn on NordVPN and Kill Switch to prevent data leaks if the connection drops.
- You’re traveling: Connect to a local server to access home services and still browse securely.
Step-by-step cheat sheet
- Step 1: Install and log in to NordVPN
- Step 2: Choose a server in your desired location
- Step 3: Connect
- Step 4: Verify IP via whatismyipaddress.com or ipinfo.io
- Step 5: Run DNS leak test
- Step 6: If needed, enable Kill Switch and Threat Protection
- Step 7: If you see your real location, try a different server or troubleshoot leaks
Security mindset: privacy isn’t a one-time check
- Regularly test for leaks, especially after software updates or when changing networks.
- Consider enabling additional protections Threat Protection if you’re browsing with sensitive information.
- Remember that VPNs don’t replace good security habits: strong passwords, two-factor authentication, and keeping software updated are still essential.
FAQ Section
Frequently Asked Questions
How can I tell if NordVPN is masking my location?
When you connect to a NordVPN server and run an IP check, you should see the server’s location instead of your actual location. If you still see your real city or country, run DNS and WebRTC checks, switch servers, and try again.
Can NordVPN leak my real IP through WebRTC?
Yes, WebRTC can reveal your real IP in some browsers. Disable WebRTC in your browser settings or use browser extensions that block WebRTC when privacy is a priority. Why Your Azure VPN Isn’t Working: A Troubleshooter’s Guide to Fast Fixes
What is a DNS leak and how do I prevent it with NordVPN?
A DNS leak happens when DNS queries bypass the VPN tunnel and reveal your real IP. Enable DNS leak protection in NordVPN, and consider using NordVPN’s DNS resolver or a trusted DNS service.
How do I test for IPv6 leaks?
If you’re not using IPv6, disable it on your device or enable IPv6 routing through the VPN if available. Use an IPv6 leak test site to verify.
Is Kill Switch necessary for privacy?
Kill Switch is highly recommended. It blocks all traffic if the VPN disconnects, preventing accidental exposure of your real IP.
Can I use NordVPN on multiple devices at the same time?
Yes. NordVPN offers multi-device support, but check your plan’s limits to ensure you can cover all your devices.
Does NordVPN hide my IP on all apps and browsers?
In most cases, yes. If you use split tunneling, only selected apps go through the VPN while others use your normal connection. How to download and install the nordvpn app on windows 11: Quick Guide, Tips, and Alternatives
How do I know which server location to pick for streaming?
Choose a server located in the country where the streaming service has content you want. Some services use IP-based geo checks, so test a few servers if you don’t get access right away.
Can NordVPN protect me on public Wi‑Fi?
Absolutely. NordVPN encrypts traffic and hides your IP, making it harder for others on the same network to track you.
What should I do if NordVPN won’t connect?
Check your internet connection, try a different server, restart the app, update the app, or contact NordVPN support if the issue persists.
If you’re ready to take control of your online location and privacy, give NordVPN a try and verify your IP across devices and networks. For a quick start, connect to a nearby server, then check your IP to confirm the mask is in place. If you want to explore further privacy features, enable Kill Switch and DNS leak protection after you verify your IP—staying private online is a journey, not a single step.
Sources:
Nordvpn Background Process Not Running on Startup Heres How to Fix It Fast and Other VPN Startup Tips Speedtest vpn zscaler understanding your connection speed
馬來西亞貨幣:令吉myr 換算、種類、使用指南與最新匯率全解析2025 VPN 安全上網與跨境支付實戰指南
台大 医院 vpn 申请 全流程指南:在家远程访问台大医院内部系统、申请步骤、VPN 设置与常见问题
丙烷割嘴 VPN 使用指南:从选择、设置到隐私保护的完整实战攻略
Лучшие бесплатные vpn для россии в 2026 году: как выбрать, что проверить и где смотреть
'%2F%3E%3Ctext%20x%3D'50%25'%20y%3D'50%25'%20dy%3D'.35em'%20text-anchor%3D'middle'%20font-family%3D'-apple-system%2CBlinkMacSystemFont%2CSegoe%20UI%2Csystem-ui%2Csans-serif'%20font-size%3D'100'%20font-weight%3D'600'%20fill%3D'%23fff'%3ELP%3C%2Ftext%3E%3C%2Fsvg%3E)
Laura Price has been writing about consumer technology since 2018, with bylines covering censorship circumvention, Wireguard, and privacy law. Approaches each review by setting up the product the same way a typical reader would and recording every snag along the way.